Create 2d Line Drawing From 3d Drawing Autocad
How to Convert a 3D Revit Model to 2D Vector Line Drawing
This tutorial covers the following information:
-
Placing a 3D View onto a Sheet in Revit
-
Export a Sheet as a .dwg from Revit
-
Opening an Exported Revit .dwg in AutoCAD
-
Using the Quick Select Menu to Clean Up an AutoCAD Drawing
-
Transferring Linework to Illustrator
2D Linework Overlay Examples
So, you're trying to take a 3D model in Revit and you want to export it as 2D linework… Here's a quick way to do that!
This is a trick that I use often for creating 2D wireframe drawings from 3D perspectives. Oftentimes, I overlay these lines as part of a collage to give another layer of information that I can easily edit. Here are a few samples of how you could apply this technique:


DISCLAIMER: This method does not guarantee perfectly clean exports of 2D linework. The result that you get from using this method ultimately depends on how you have created your model in Revit. The quantity and type of 3D geometry that you have in your model will affect the linework quality.
With that being said, let's get started.
For this method, we will be using AutoCAD and Revit. If you are looking to edit the resulting linework in Illustrator, there is a simple method for doing that which I cover at the end of this tutorial.
Place a 3D View on Sheet in Revit
First, open Revit and navigate to the 3D drawing that you want to export linework from. This will be either a perspective or isometric view. For this example, we will use a perspective view.

Create a new sheet to place the 3D view onto, and name it accordingly to keep your files clean. When we export this sheet, the name of your exported .dwg file will correlate with the sheet name that you choose.
Next, drag and drop the view onto the sheet you just created.

Export the Sheet + 3D View From Revit
In the main navigation bar, select "File" -> "Export" -> "CAD Formats" -> "DWG". Select the location that you would like the .DWG file to be stored.

It may take some time to export, but that depends on the complexity of your 3D geometry. If it takes a LONG time to export, that's a good indicator that you may have a lot of geometry in your file. Always be conscious of how much detail you want to show, and be sure to turn off or hide geometry that you won't necessarily need for your 2D linework drawing.

Once the drawing is finished exporting, navigate to the folder and you may notice two .dwg files have been exported. Revit defaults to exporting both the 3D model and the 2D sheet as separate files.
Open the Exported Revit .dwg in AutoCAD
We want to open the 2D sheet file in AutoCAD. Right-click the file, select "open-with", select AutoCAD as your program.

In the "Model Space" of AutoCAD, you should see the drawing that you just exported from Revit, along with the sheet.

NOTE: FOR SCALING 3D DRAWINGS
Perspective views are ultimately scale-less. Isometric views, however, can have a scale factor. It is important to check your scales when moving between programs, as units can sometimes change.
In your drawing, you will see that Revit has exported linework and surfaces that are appearing as hatch patterns in AutoCAD. You will typically need to clean up the drawing a bit. Since Revit and AutoCAD work well together, you will notice lines and hatches are separated into layers based on your organization in Revit.
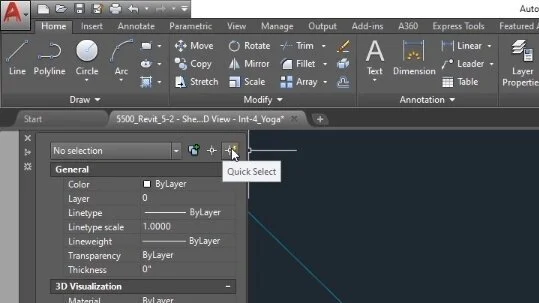
Use the Quick Select Menu to Clean Up The AutoCAD Drawing
If you want to get rid of the hatches quickly, go to the "Properties" tab. Open the "Quick-select" menu, which is the icon with the lightning bolt (because… speed!). For object type, select "Hatch". In the "Operator" section, select "All" and hit OK.

If done correctly, all of the hatch work in the drawing should be selected. Simply select "Delete", and all of the hatch work will be removed from the drawing. Now you should be left with a pure line drawing.

Transfer Linework to Adobe Illustrator
At this point, this may be all that you need, but if you would like to transfer this drawing to Illustrator, here's how you can do it:
To move your linework into Illustrator, go back to AutoCAD and type command "Select", "All". Follow with "Control"+"C" to copy the linework to your clipboard.

Open up Illustrator and simply "paste" the linework.
Illustrator typically groups everything together, so if you want to edit these lines individually, be sure to right-click and select "Ungroup".

From here on, you're all set. You can now edit these lines in Illustrator to your heart's content.
Good luck!
Want More Time-Saving Tips?
Subscribe to my newsletter, or follow me on social media!
Featured


Source: https://rascoh.studio/blog/how-to-convert-a-3d-revit-model-to-2d-vector-line-drawing
0 Response to "Create 2d Line Drawing From 3d Drawing Autocad"
Post a Comment